Monday, July 1, 2019

Gifts for: a Wedding

Of course, your best bet for a wedding gift is something from the registry. I know some people feel registries are impersonal, tacky, or even selfish, but they're very useful. A wedding invitation isn't a demand for a gift, or even an appearance (rare boorish cases aside). People getting married want to celebrate, and people excited for them tend to want to give gifts. Registries are great for ensuring you buy what the couple can use and enjoy, and to avoid duplicate gifts. But some couples don't use registries, and sometimes you might want to add a personal touch

STOREBOUGHT

If nothing on the registry stands out to you, a gift card to the store is a good idea. Most places that offer registries also have a completion discount, providing the newly-weds a discount on any unpurchased items after the wedding. Cash is good for this too. One of my uncles, having already given us use of his and my aunt's beach-front house for a honeymoon weekend, handed me a stack of bills at the reception, for "gas money"--almost three times what the fuel actually cost. We were very grateful.

In general, gift cards can be useful. Not just to housewares stores either; grocery stores, home improvement stores, restaurants, or for places or events you know the couple likes. 

If you know what the coupllikes to do, or where they're going on their honeymoon, you can buy something to facilitate that. Foreign currency for a trip abroad, money for exotic vaccines before overseas travel, a collage picture frame or photo album, tickets to an event, passes for an attraction like a museum, zoo, or sports event--something to help them enjoy their time together.

For couples who are setting up their first home together, housewares are certainlappreciated. If there's no registry to guide you, buying things intended to match, like plates, is tricky. But individual serving platters or bowls or seasonal hand towels or other "one at a time" items could work. For one of my cousins, I found a set of drinking glasses with the logo of her and her husband's favorite sports team: they would like it, and it wouldn't matter if they didn't match their place settings because they were more oa novelty items. Include a gift receipt just in case.

You can also make up a gift basket to stock up a pantry (flour, sugar, etc), bathroom (soap, lotion, shampoo), first aid kit, cleaning supplies; or something more fun like a date night.

HANDMADE

In general, I prefer to make small things as accents to registry items. When I was invited to a wedding last summer, I bought some towels from the registry, green and brown, and knit washcloths to compliment them.


Similarly, my mom often knits seven dishcloths, one for each day of the week, and puts them inside a baking dish bought from the registry. Or adds potholders, embroidered towels, and other kitchen goodies.


There are a lot of things you can add to wedding gifts. Think of what you can make that can be used in a home: picture frames, kitchen utensils, throw pillows, decor, etc. Maybe even a handmade card.

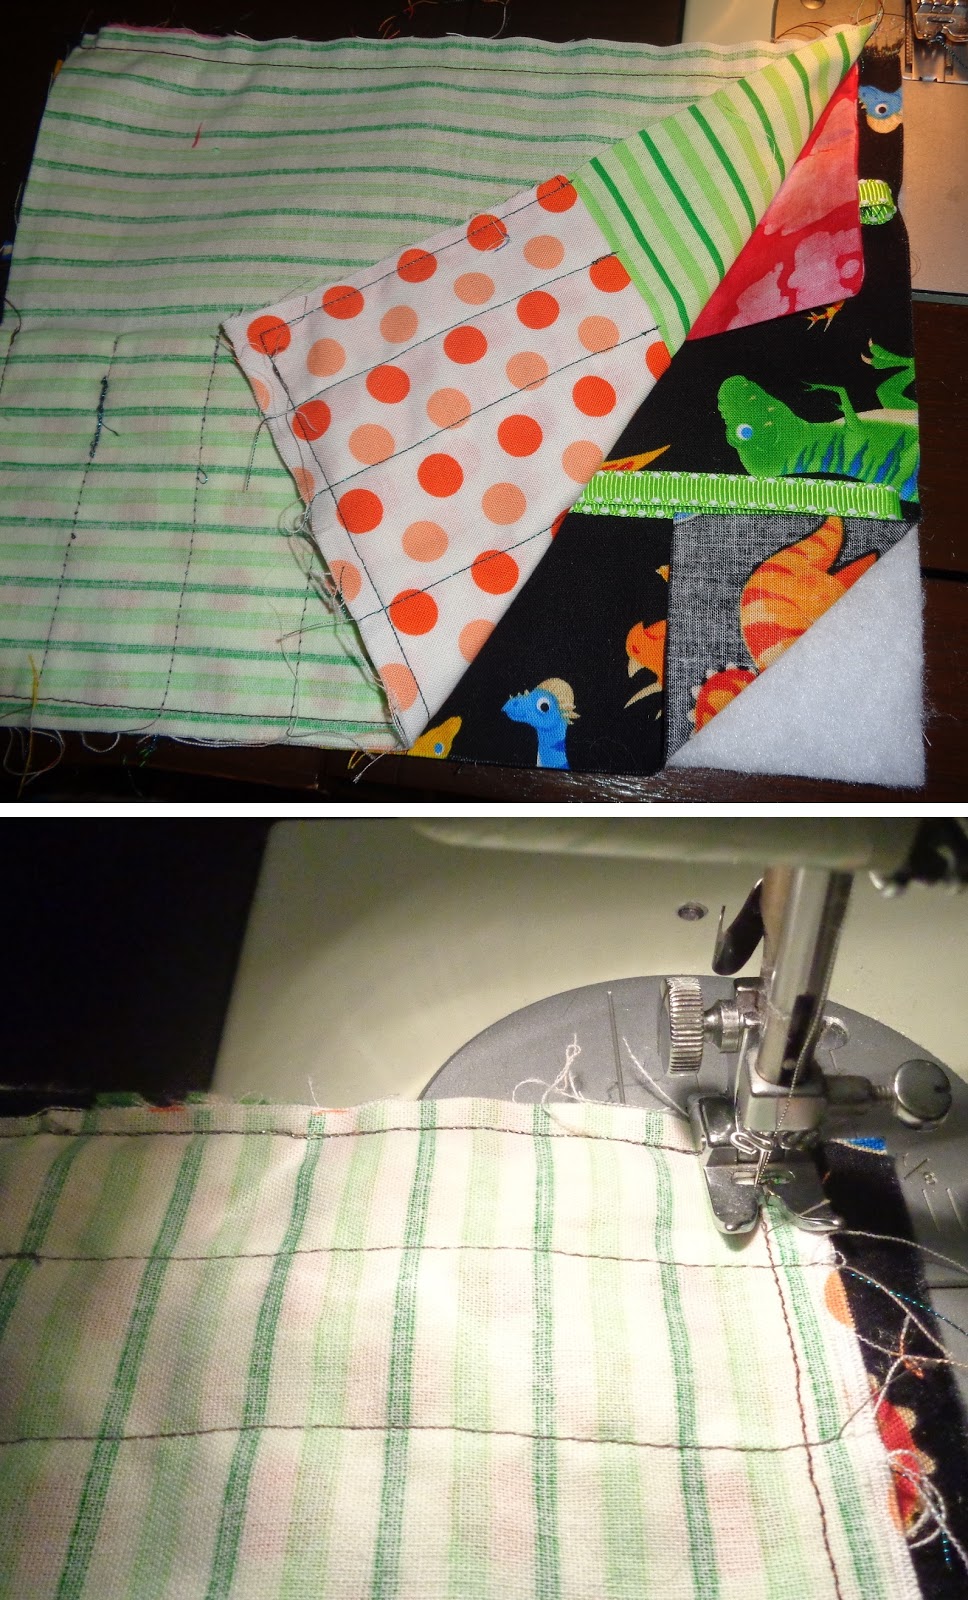
The groom loves dinosaurs. I drew the scales by writing their initials over and over.
And decorated these toys to be a bride and groom.

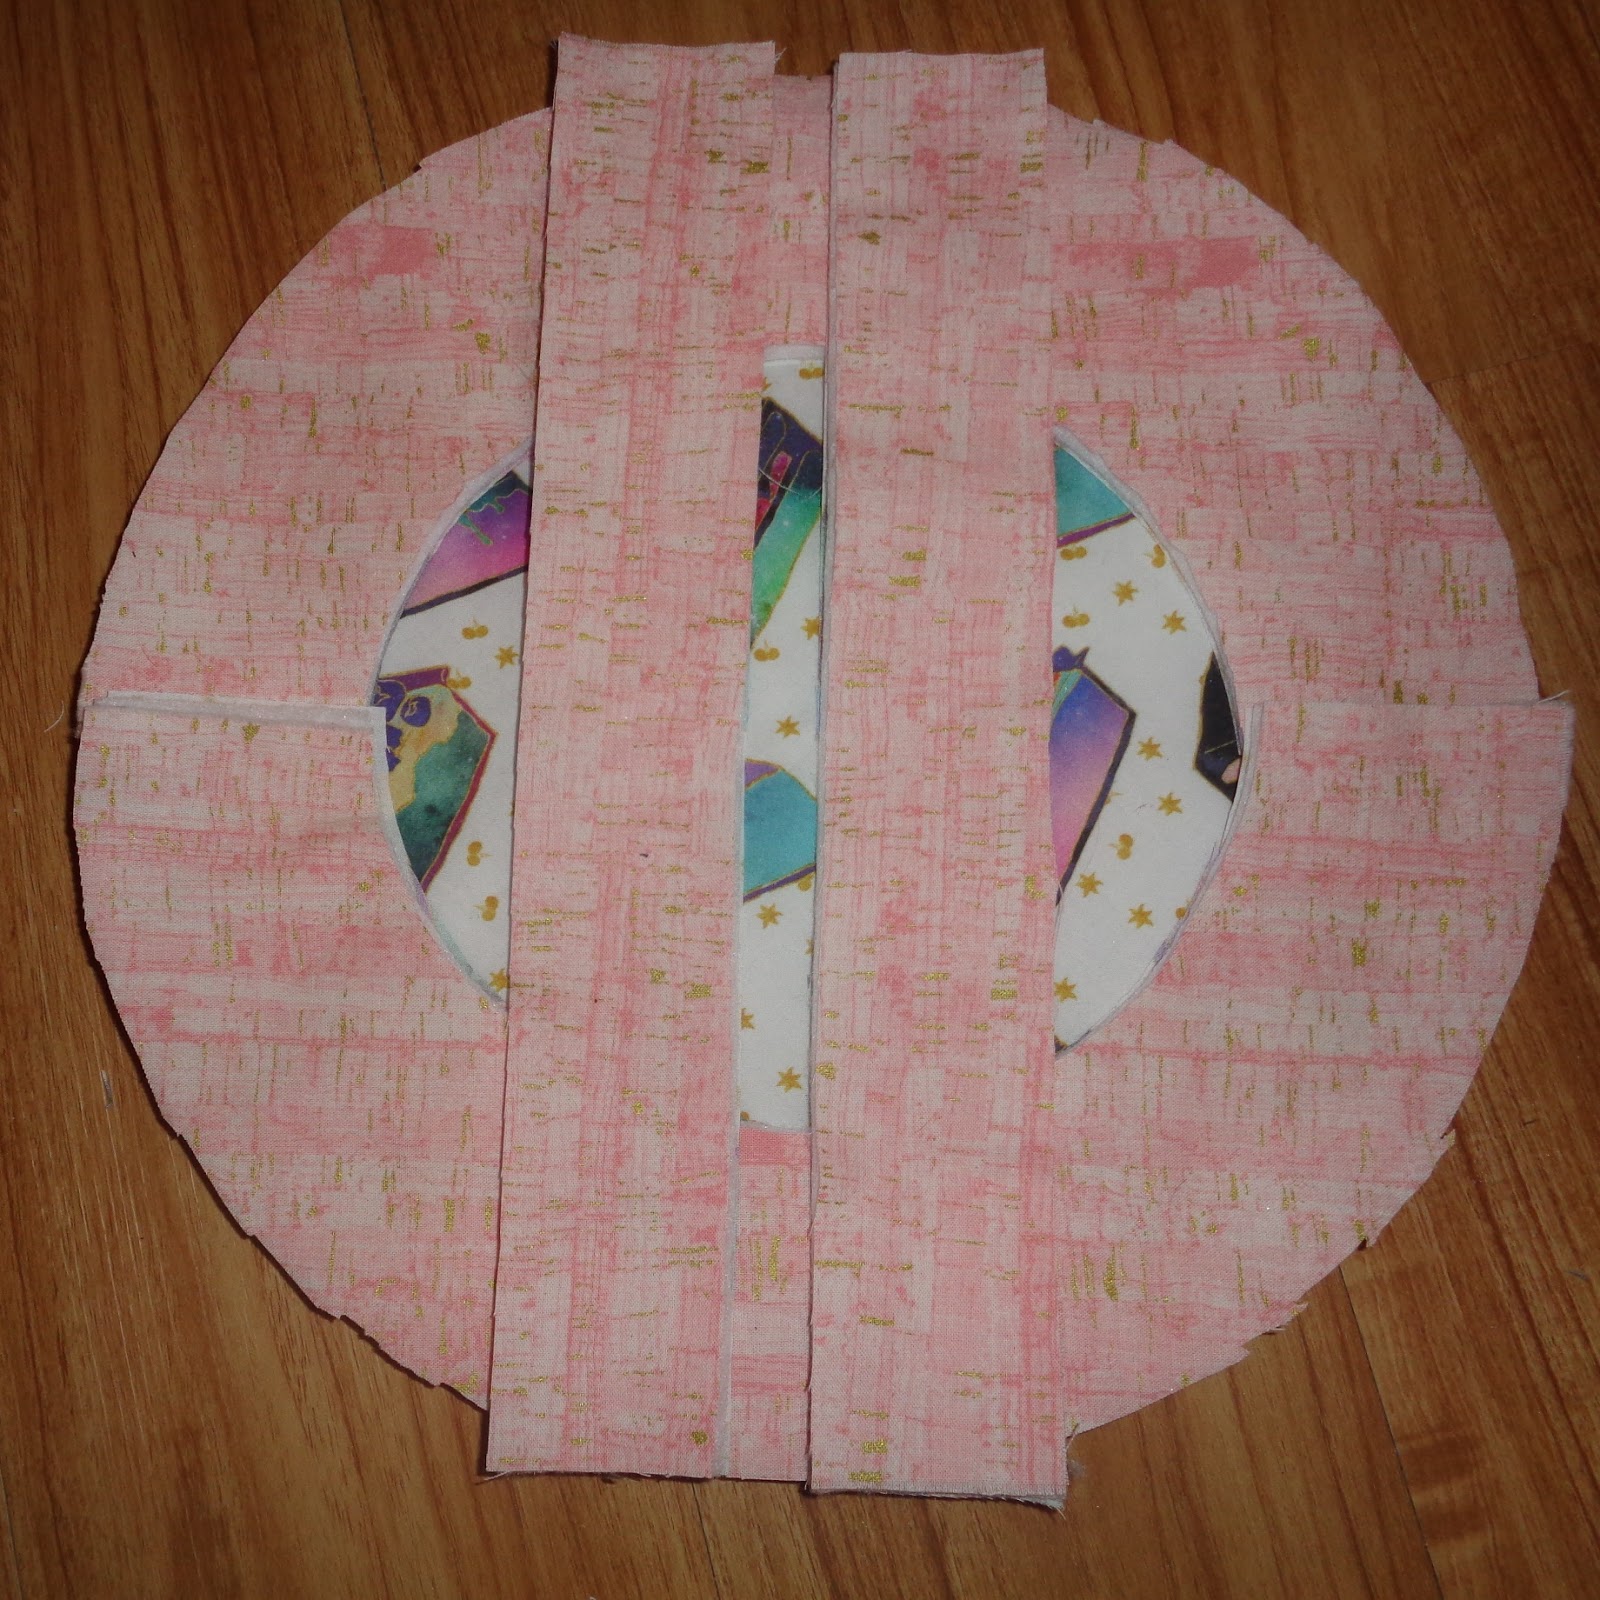
When someone close to me is getting married, I do a bit more, usually to the tune oa knit blanket in the wedding colors. We got one from a family member embroidered with our wedding date, and still have it over a decade later, so I like to give blankets too. One friend in particular had been through rough patch and things finally started looking up for her. I felt like spoiling her a bit, so I made a blanket in the wedding colors, plus dishcloths, pillowcases embroidered with the wedding date, and bought two registry items in the wedding colors.

They use the decorative box to hold sentimental things.
The point oa wedding gift is to show the couple that you're excited for them and want them to have a happy life together. Keep that in mind, and you'lfind the inspiration you need.

Saturday, June 15, 2019

Sewing Tutorial: Pie Carrier


A woman I worked for handed me an item like this that her grandmother had made years before, wondering if I could reverse-engineer it. I took it home, pondered it for a few days, and figured out how to make my own.
A pretty and convenient way to carry your desserts.
Works well for a plate of cookies, too!

SUPPLIES

Two half-yards of fabric, one for the outside and one for the inside (one yard total)
About four yards of bias binding
Batting
Ribbon or other item for ties


I use a set of dollar store shoelaces; the aglets mean I don't need to worry about fraying.
I found the pie fabric on the Spoonflower website in J. M. Clemenson's shop.


DIRECTIONS


Once the fabric is washed and ironed, cut a circle with a diameter one to two inches larger than your pie pan. You'll need three circles: the outside fabric, the inside fabric, and the batting.


This serving plate of mine is just big enough to be a guide
I layer all the fabrics together as I cut them so I don't need to repeat the steps three times:
batting inside the inside and outside fabric, both right sides out.
Next, cut the crescents that go on the top of the pie. I find the easiest way to do this is to cut another set of circles then use a smaller plate (salad plate, in this instance) as my guide to make the crescents about three inches thick, and cut it in half to make the two crescents. Again, you'll need one inside fabric, one outside fabric, and one batting.
Or cut the semi-circle first, then use the plate as your guide to make the crescents.
Use the little semi-circle as part of a heart-shaped oven mitt.
Cut the two straps. They should be about an inch longer than the diameter of your original circle and two to three inches wide. Now you have all the pieces: the circle, two crescents, and two straps; each one a set of one outside fabric and one inside fabric, both right sides out, with batting between them.
These crescents overlap a bit, so I need to trim them.
There we go.


Layers
Now you will sew the long edges of the straps and the inside edges of the crescents. Use a narrow seam allowance, and trim the edges as necessary.
Could have gone a little narrower, but that's nothing my Ginghers won't take care of.
Next, sew on the bias binding. I am lazy and bought bias tape; double-fold is best for all these layers. When you add it to the crescents, do the short, straight edge first. Sew your ties in when you add the bias binding to the inner curved edge. 
Make sure it's long enough to be tied into a bow; five or so inches will do it.

Sewn securely to the crescent.

Inner edges done!
Now layer the pieces, pin them in place, and sew the outer edges of the circle. As before, use a narrow seam allowance and trim the edges.
Watch out for the ties, and be sure to catch all the layers.
All you have to do now is sew the bias binding on the outer edge of the circle. And bake a dessert to go inside it.

Saturday, June 1, 2019

Throwing a Holiday Party

People like to get together to celebrate cultural and religious holidays. If you're on tap to plan one, here are some things to consider as you plan.

FOOD

Will you prepare it all yourself? Have the party catered? Meet at a restaurant? Organize a potluck? What kind of food will you have? Is it a barbecue, a sit-down dinner, a buffet?

Some celebrations come with their own standard menus. Thanksgiving has turkey, Easter has ham or lamb. If you're preparing the main course, be sure to plan enough time to have it ready to eat when you want it: it might need to be thawed, marinated, seasoned, or browned before you start cooking it. Especially if you are also preparing other dishes, try to pick recipes that don't need to be tended often as they cook. Slow cookers are great for this. Whatever you can make ahead of time, do. Most cookies and breads can be frozen for several days and thawed before the party, for example. Non-perishables, like nuts and chips, can sit in their serving bowls with a dishtowel covering them for a few hours while you get other things ready, and cut fruits and vegetables can wait in the fridge on their serving trays until the meal starts.

If you hire caterers, be sure they know the right address to come to, and that they can work with whatever dietary restrictions you need addressed. Find out exactly what sorts of serving items they provide. You might need your own plates and utensils, for example. 

For a party held at a venue, reservations are a must. Especially at busy holiday times, you simply can't expect a restaurant or hotel or other place to accommodate a crowd at the last minute. Make the reservations well in advance. My husband is taking my mother-in-law to a fancy restaurant for Mother's Day (May here in the US), and when I made the reservations in December, there were already almost no slots left. And that was just for two people! Some venues offer special menus for holiday brunches; check to see if yours does, because if the only reason you want to eat a particular place is the dish that isn't being served that day, you'll be disappointed. As with caterers, you'll need to be sure dietary restrictions can be worked around. A steakhouse might have few options for a vegetarian, and a Thai restaurant with peanut sauce on everything could be problematic for someone with allergies.

If everyone is bringing a dish, check that all your bases are covered. You don't want to end up with eight kinds of pie but no main course (or maybe you do, but then you'll want to coordinate different kinds of pie). You can assign people dishes based on last names (e.g.; A-M brings a side, N-Z brings a dessert, you provide the main course), generations (e.g.; grandparents bring snacks; parents, aunts, and uncles bring sides or main dishes; cousins bring desserts), their specialties if people are known for certain dishes, or if everyone's communicating have a list of what foods should be brought and have people sign up.  Potlucks work best with lots of communication.

ACTIVITIES

For a lot of parties, socializing is plenty entertainment for everyone. Especially if it's a group that rarely gets together outside of the holidays, catching up is great fun. In those cases, the only things you really need to think about are whether you need a space for kids to play, somewhere for pets (either yours who might be overwhelmed with the crowd or guests' animals), and enough places for people to sit.

If your party is centered around an activity, be it more passive like watching the Super Bowl or more active like a family golf tournament or baseball game, you'll need to plan a bit more. Depending on how involved the activity is, you need to have a timeline of when events should be starting, and an idea of how flexible you can be with the schedule.

If you want activities for only some people, like a cookie decorating area for kids at a Christmas party, you will probably need to have someone keeping an eye on it throughout the party. That person won't be able to socialize as much, so if you can't swap out now and then, you might consider hiring a sitter. I knew a family who loved hosting holiday parties, and there were always about a dozen kids between the ages of two and seven. They would hire me to stay in the large downstairs playroom with the kids so the adults could chat more easily (and they paid very well, plus the other parents usually tipped--I never minded being called for a party!). The parents were right upstairs for any children who needed to sit in Mom or Dad's lap for a bit, and the parents knew their children were safe and having fun.

GIFTS?

If the holiday you're celebrating is a gift-giving one, you need to decide how formal you want that to be. Most people enjoy watching others open the gifts they've (hopefully) thoughtfully selected. 

If you have a gift exchange with "stealing" rules, you need to make sure everyone participating is in the room. Before the party, you should also have made sure everyone knows the expectations of the gift exchange. The most important parts are the upper and lower cost limits, whether it should be a gag gift or a serious gift, when to open the gift (at the end of the game or immediately after picking it), and whether people can "steal" a gift someone else already selected.

When people are giving gifts to specific recipients, there might a large pile to sort out. How do you want to do this? Do the gift-givers pass out their gifts en masse? Do you designate one or two people to pass them out (don't pick the same people every year unless they like it)? Is it a free-for-all? The group you're celebrating with will dictate what works best for your situation.

TIMING

If you need the party to end by a certain time (whether because you'll want to have your home to yourself again or because the venue will close), make that clear from the beginning: "The party will be from 2:00 to 8:00." If it's open-ended, just tell people it's a open house (specify when you'll be ready for guests, though). Be clear in communicating what needs to be done by certain times, if there is anything; for example, when the fireworks show starts or how late you'll keep the buffet spread on the table.

MISC

Make sure that wherever the party is there's adequate parking. If some guests have mobility issues, allow them priority parking and be sure they have a place to sit. 

If you're hosting at your house, let people know any codes they might need for gates or doors. Have a place for people to put away coats or change into swimsuits as needed. Stock extra toilet paper and soap in the bathrooms, and have a plunger at the ready just in case. Depending on what sort of food is being served, you might want to consider a spill station too, with club soda, towels, and other things to mitigate stains. Close doors to rooms that are off limits, and while I hope you won't have to worry about it, consider whether you should lock up any medications, sensitive paperwork, or valuables. 

If you expect people to take food home with them, have foil, plastic wrap, plastic bags, or plastic containers for them to use. One of my aunts keeps the resealable plastic containers some lunch meats come in, and has a stack of them by the buffet table after parties (clean, of course).

When the party's done, be sure anyone who needs to be paid (caterers, venue operators, sitters) gets paid. Clean up what you need to if it's not at your home. If it is at your home, do you want guests to help clean up? Many will offer to help with dishes or other clean up, but if you thrive on the specific order you keep your home in, you might not like the help (one of my grandmothers was this way; we could help put the food in dishes to store in the fridge, but she was particular about the rest).

Hosting a party is a big responsibility, but if you're organized as you prepare for it, it will go smoothly and your guests will have a good time.

Wednesday, May 15, 2019

If You Can Bead, You Can Make...


Working with beads is a great way to make beautiful things. They can be sparkly accents on handmade or storebought objects, or the beads themselves can be made into a gift. Craft stores carry a wide selection of beads, and of course there are stores specifically for beads as well. My favorite online source is ArtBeads.


Beads give this knitted necklace an elegant twist
(project and photo by Ravelry user Speattle, pattern here)
This purse is fully lined, giving it more durability and ensuring nothing will slip out the holes between the knitted stitches or the spaces between the beads.
(project and photo by Ravelry user Speattle, pattern here)

Jewelry, ornaments, and decorations are the easiest gifts to make with your beading skills. You have to think carefully before making a toy or heavily-used item out of beads; the beads might break, fall off, or get in the way of a "more practical" item's use. But a gift doesn't have to have a use beyond being beautiful for it to be appreciated.

My dad taught me how to make these bells. This YouTube tutorial is similar, although we use twelve 8mm faceted beads for the beginning circle and she uses the 3x6mm oat beads (the third type of bead is 4mm pearl beads; I've found all at JoAnn and other craft stores, and online on Etsy and eBay). A written pattern very close to how we do it is here.


Left and right are jewelry pieces my sister-in-law made for me to wear in my wedding (left; I commissioned her) and hers (right; I was a bridesmaid). Middle is a set my best friend made me for Christmas.
Not strictly beading, but similar--a coworker of my husband's makes dreamcatchers uses feathers she finds at their workplace, owl, crow, and northern flicker in this instance. This is hanging in our kitchen.
A selection of Christmas ornaments I've been given by various friends with beaded accents


You don't need to be a beading master to enjoy it. Kids can get in on the fun, too.
My cousin made this for me when were teens. My kids play with it now.


There's a certain charm to these creations of my two- and four-year-olds.


Beads as accents or the entirety of baskets, keychains, clothing, curtains, accessories, jewelry, wall hangings, frames--they can add a touch of beauty, elegance, fun, or whatever you want. With so many kinds of beads and charms, your imagination is the limit.

Wednesday, May 1, 2019

Gifts for Saying Thanks

Most of the time, a thank you note is enough acknowledgement for a gift (depending on your relationship with the gift giver and the occasion, thanking in person or by phone call, text, or email can also work). Some gifts are so appreciated that you might feel compelled to go a step beyond.

THANKS FOR THE GIFT; HERE'S ONE FOR YOU

For example, someone once gave us a car. It was a time we really needed one, and the previous owner wouldn't even let us pay for the check-to-buy inspection he insisted be done. We were obviously incredibly grateful. To show our gratitude, we sent pictures of our kids and the car "going on trips" (i.e.; being used as the previous owner had hoped) and I knit a blanket in the previous owner's favorite colors, sent with a letter about how much of a blessing the car was. Before we were given that car, I also knit a blanket for a couple who loaned us their car when they were on a three-week vacation. Their vacation matched up nicely with some appointments that would have been difficult to manage on the bus.

Handmade additions to thank you notes are often a good way to go. A batch of cookies, some homemade bread, useful household items like potholders; they're little ways to show you appreciate the extra effort someone took to do something really special. I especially like handmade things if I'm given craft supplies. A few times, I've been the recipient of someone clearing out sewing or knitting stashes. Making someone a small thank you gift from the supplies is my way of showing that I can put the supplies to immediate use. Even a picture of something I've made with the supplies can brighten the giver's day.

Generally, I would give something back to whoever gave me the supplies, but sometimes showing how I'm paying the gift forward is even better. For example, when my grandmother-in-law gave me her yarn supplies, I integrated some of her crochet swatches into Christmas presents for my nieces and nephew, her great-grandchildren. She really appreciates knowing that they have keepsakes of her.

If you're not up to making something or you don't think the person would appreciate it, gift cards are always great, especially for restaurants. It's a way of saying that since the person made your life easier, you're returning the favor.

THANKS WHEN TRAVELING

Hostess gifts are fairly common whether you're going to a friend's house for dinner or staying at someone's house for a few nights.You might want to bring along a dessert or appetizers to go with the meal. Whenever I spend the night at my parents' house, I bring dinner--usually lasagna. Bottles of wine are a classic go-to. If you're not sure whether alcohol is appropriate, you might want to pick out some food item your area is known for or locally made soap or candles (especially if the thank you gift is to thank a hostess when you're visiting from out of town). When we took a road trip around the country, we brought things like smoked salmon from Seattle to friends and relatives in other states who we stayed with. 

If you're gone for a while, you might have someone watering your plants, collecting your mail, or taking care of your pets. On a different road trip, we brought back coffee from Yellowstone National Park to thank the friend who took care of our cat while we were away. 

Gift cards are also great; enclosing one with a thank you note doesn't even require an extra stamp on the envelope.

THANKS FOR WEDDINGS

For wedding attendants, common gifts include jewelry (especially if it's to be worn at the wedding), alcohol, or paying for some or all of the attendants' attire or travel, and there are other ideas too. My dad was best man at a few weddings, and one couple passed out books about home maintenance. About four decades later, Dad still references that book. 

You might want to give something to the wedding officiant too, or other people involved in setting up the wedding (of course, the professionals are also getting paid, so they are getting some compensation). I opted to make a blanket for the priest who married us and sent it on our first anniversary, but in my case, it was the same priest who had also baptized me, given me first communion, and had been at my confirmation. He's a family friend.

Many weddings also have some sort of memento for guests to take home. My two personal favorites I've seen are coasters that fit theme of the wedding (check Oriental Trading Company for good bulk rates) and candy stations, where guests can fill bags of sweets which are usually color-coordinated with the wedding colors. The last wedding I attended had this, and the snacks were nice for the plane trip home.

THANKS FOR YOUR TIME AND TALENT

When an era is coming to a close, be it a retirement, the school year ending, the big theater production having its last performance, or whatever else it is, it's natural to want to show the people who made it all worthwhile that you appreciated it. A card or collection of cards from everyone, a picture everyone signed, a gift card everyone chipped in for--it doesn't have to be extravagant. Having been a coach, I can say that knowing I helped my athletes learn something new or enjoy a season means a lot. 

Many people like to recognize service workers at the holidays: letter carriers, regular hair stylists, sanitation workers; anyone whose services you rely on to make your life easier. I like to get small gift cards or little treats. During a hot stretch last summer, I put some cold drinks in a cooler for the waste management people, and when it dropped below freezing for several days, I left hand warmers out.


Again, in most cases the thank you is thanks enough. There are times though that you receive something truly moving, or you want to find a way to show how important someone is to you, and a little something extra feels right.

Monday, April 15, 2019

Sewing Tutorial: Art, Craft, or Makeup Supply Pouch

My four-year-old’s preschool teacher asked me to come talk to the class about sewing. I told them (briefly) about finding patterns, picking fabric, cutting pieces (with warnings about asking an adult first and to only use them cutting tools for fabric), sewing them together…and ripping seams. I’ve been wanting to use up my leftover pieces, so I made each kid a little marker/pencil/paintbrush/etc holder. I had a lot of markers that one of my mom's friends gave me, enough to put two in each of the eighteen holders. 


SUPPLIES

Less than a fat quarter’s worth of fabric scraps
Batting
Ribbon

DIRECTIONS

Once the fabric is prewashed and ironed, cut four 7x9inche pieces. Cut a 7x9 inch piece of batting, and two 20 inch long pieces of ribbon. Decide which pieces of fabric are for which part. You’ll need an outer fabric, an inner fabric, a flap, and a pocket. The inner fabric will show the least.

Here, my outer fabric is dinosaurs,, my inner fabric is green stripes, my flap is red, and my pocket is orange polka dots
Fold the flap fabric right sides together lengthwise (making a 4.5x9 inch piece). Sew the short (4.5 inch) edges closed, using a large seam allowance—I used half an inch. Turn right side out and press to make a crease along the folded edge. Fold the pocket piece wrong sides together in half lengthwise and iron to crease the folded edge.


Layer the pieces as follows: inner fabric right side up, flap on top, pocket on bottom. Sew the fllap in place along the top and all along the raw (non-folded) edges of the pocket, using a narrow seam—about a quarter inch.

Mark the middle of the pocket lengthwise, and mark about every inch and a quarter from the middle to both edges. Using your ruler and disappearing ink, draw lines to guide the sewing of the eight pocket compartments. Sew along guide lines.


Sew the ribbon on the outer fabric, about two inches from the top and two inches from the bottom. Only sew about four inches of the ribbon, starting half an inch from on edge.

Sandwich the pieces together as follows: batting, outer fabric right side up (be careful to tuck the ribbon in), inner fabric (with flap and pocket pieces sewn on) right side down. Sewn all along the perimeter, using the stitches you’ve already sewn as a guide. Leave an opening for turning.

Turn, iron, and top-stitch. This step and the step for putting on the ribbon are good for decorative stitches. Since I was making 18 of these, I just used a simple zig-zag.

Monday, April 1, 2019

Sewing Tutorial: Charming Soft Baby Cube Toy

I first made one of these as a baptism present for my cousin’s baby girl. The six symbols are an Ichthus (Jesus fish), Alpha and Omega, INRI (Iesus Nazarenus Rex Iudoreum, Latin for Jesus of Nazareth, King of the Jews), an IHS symbol (Latin for In Hic Signa, which means in this sign, from the story of Constantine’s conversion to Christianity), a Chi-Ro (one way to abbreviate Christ, again from Latin), and a cross. I later also made a set of simpler ones with geometric shapes: circle, square, triangle, octagon, star, and heart. Both sets of shapes are in the PDF at the bottom of the page, which you can download to act as a guide for cutting the shapes.
She's one of my godchildren
SUPPLIES

Six charm squares or one quarter yard of background fabric
Six charm squares or one quarter yard of fabric for the shapes/symbols
Poly-fil or other stuffing
Optional: 6-12 jingle bells

DIRECTIONS

Prewash and iron your quarter yard of background fabric. Cut six 5x5 inch squares, one for each of the cube’s faces, or iron your six background charm squares. If you’re using a single cut of fabric and want all the faces the same size, you can also cut a cross shape told fold into a cube.
 I still sewed along the edges of this one to help it keep its shape.
Prewash and iron your second fabric, or iron your second six charm squares. Cut your desired shapes and appliqué them onto the six faces of the cube. 
Assembly line!
Using a quarter-inch seam allowance, sew the faces to each other right sides together along their edges. Leave an inch or two open for turning and stuffing. Be sure they’re facing the ways you want them to, and that they’re in the order you want. The arrangement is completely up to you, just be sure you do it the way you mean to. 
 For the religious symbols, I like the Ichthus and the Alpha and Omega on opposite sides, the INRI and IHS on opposite sides, and the Chi-Ro and cross on opposite sides. For the shapes, I pair them circle and octagon, square and triangle, and heart and star. 
Once they’re sewn and turned, stuff them firmly with Poly-fil or something similar. If desired, put a jingle bell or two in the middle so the cube will make a noise when shaken. Hand stitch up the last little bit, and you’re done!
A bit of thread to close that gap, and they’re ready to be played with. 
Here is the PDF of the symbols and shapes: Shapes and Symbols