Showing posts with label child. Show all posts

Saturday, May 1, 2021

Gifts for Athletes, Coaches, and Sports Enthusiasts

A person's hobby or passion is a great starting point for brainstorming gifts. For people into sports, whether they compete themselves or just like to watch, there are a lot of ideas.

SPORTING SUPPLIES

Athletes often go through a lot of supplies: athletic tape, pre-wrap, Band-Aids, and ice packs are a good bet for most. Healthy snacks and water are also a good idea, especially for long competition days. For outdoor sports, sunscreen or other sun protection is a must--people can get sunburned even on overcast days, and it's not uncommon for people to forget how well snow reflections UV rays and end up badly sunburned while participating in snow sports. Depending on how close to nature the outdoor sports get, bug repellant or antihistamine lotion could be good, too. While coaching cross country, I have twice been to meets where the race course ended up going by a hornet nest. Fortunately, the athletes who got stung weren't allergic (the one who was allergic had forgotten his sting kit the first time, but never did again!).

Most athletes have at least a few pieces of equipment they have to transport from one place to another. Whether it's a full set of pads for football or just specialized shoes for racing, it's nice to have a good, sturdy bag (handmade or store-bought) or other way to carry the things around. Some equipment is tougher to carry than others--poles for pole vault aren't heavy but are very long! If you find a creative solution, offer it. My track and field coach saw a large plastic pipe at a construction site while he was on the way home from work, pulled over, and asked how he could buy one. It was wide enough in diameter to fit several poles in, so while it was still a two-person job to carry the poles, they were no longer slipping around as we did. Heavy equipment like weights and throwing implements need very sturdy carrying cases; others might need very large ones. Most athletes have at least two layers for competitions, warming up perhaps in sweats and then competing in a shorts-and-t-shirt sort of uniform. If you're able, you can offer to watch the athlete's things during the competition. When I coached, I bought the team a backpack with lots of pockets to keep jewelry in, as it wasn't allowed to be worn during competition (I also bought pads and tampons to keep in it, given out at the discretion of the girls' team captain).

There is a plethora of sport-specific equipment. A track and field athlete might need replacement spikes to screw into her jumping cleats, a soccer player might need new shin guards, a volleyball team might need a new net. Corporate sponsors often help teams by purchasing uniforms or other supplies in exchange for having the company name advertised at games--plus it helps the often-young athletes learn valuable social, health, and time-management skills.

SPORTING SUPPORT

Athletes and coaches put a lot into their passion. Acknowledging their hard work is a great gift. By simply showing up to a sports event to watch your nephew pitch or your sister come in under par or your friend coach a basketball team, you're demonstrating that you appreciate that time and effort. 

My grandparents had a tradition: when one of their grandchildren earned a varsity letter, they'd buy that grandchild a letterman's jacket. I loved getting mine after working to earn it! 

Supporters might also bring healthy snacks like fruit, or water. Maybe a team has a tournament far away and needs to raise cash to fund the trip--spreading the word about the team car wash or other fundraiser is helpful, as is donating gasoline gift cards or other in-kind help. When I did high school sports, a teammate's parents took pictures throughout the season and gave each of us an envelope with a couple dozen pictures of our season highlights. I still have some of those pictures years later!

FAN GEAR

Someone who supports a team, whether playing the sport or not, is likely to appreciate items with the team's logo on it. You do need to be sure not to go overboard; most people don't like getting the same thing year after year or being defined solely by one aspect of a personality. But if you know someone would like a team shirt (and the person's clothing size!), or beer mug, or home décor object, or team-emblazoned household objects like cooking utensils, you're set. My husband loves the Green Bay Packers cheesehead my brother gave him for Christmas years ago. Maybe a book or movie about the team's history or triumphs exists, or team-themed food. They don't even have to be team-specific: Girl Scouts are told to suggest people buy boxes of cookies in colors that support local teams, like green Thin Mints and blue Trefoils for the Seahawks, Mariners, and Sounders here in the Seattle area.

If the team is local or will be playing nearby, a pair of tickets could be perfect. As with any time-sensitive gift, be sure your recipient's schedule and health allow for the outing. Some teams hold events (in their local areas) for meeting fans; that's another fun option.

A great piece of memorabilia is autographs. They can be pricey on websites like eBay, but that's not the only place to get them. Teams that hold events open to the public like picture days are a good place to find autographs. I've been able to get a few just by writing to the team or athlete and asking (include a self-addressed stamped envelope). My mom got me an autograph of an Olympic athlete the same way, by writing to the college where she now coaches. Keep your eyes open at sporting events: my brother and I have both been at track meets attended by Olympians who were happy to give us autographs when we asked. Another time, I was at the homecoming game for a college football team, and overheard two other people in the stands talking. I told them it sounded like they were reminiscing about having played and it turns out they were two of the more famous past players. They were flattered to be asked for an autograph, and gladly signed my ticket. Any sports fan will love having a piece of history!
Left to right: Stacy Dragila, Dave Johnson, Cliff McBride,
Spider Gaines, and Tommie Smith


Thursday, April 1, 2021

Gifts for Milestone Birthdays (and other fun events)

While any birthday can be fun in its own right, some have special meaning. These will vary depending on your culture and heritage--some numbers have more significance than others for different people. A person's very first birthday is important in many cultures, and although the child won't remember whatever is done to mark the occasion, most people still enjoy doing something to celebrate. Other ages have special meaning depending on where you live. For example, turning 15 is a big deal in Mexico and other Latin American countries where a girl celebrates with a quinceañera, but isn't as important an age in my culture. If there's a particularly extravagant gift you want to give someone, a milestone birthday is a good excuse to give it.

Reaching the next decade of life often stands out as extra reason to celebrate. I have dozens of aunts, uncles, and cousins, which makes celebrating each of their birthdays individually a bit unwieldy, but I make sure to send them cards for their fortieth, fiftieth, sixtieth, seventieth, eightieth, and ninetieth birthdays (we've had a few of the extended family make it to the century mark, but that was before I learned to read and write). If the importance is the number itself, a gift of that number of items can be nice. When my parents turned 60, my siblings and I gave them each a $60 gift card to mark the occasion, more than we usually spend on their birthdays. While you might normally call or visit around a birthday, big milestones can be the impetuous for more people to be able to visit, or for you to save up for a trip to see the person. When my paternal grandfather turned 80, we all gathered for a party for him--and did the same ten years later when he turned 90. A few years after that, there was a similar party on the other side of the family when my maternal grandfather also became a nonagenarian. 

Sometimes the reason for extra celebration is new privileges the new age brings. In the US, a person can get a driver's license upon turning 16, becomes a legal adult at 18, and is allowed to buy alcohol at 21. It's pretty common to see gifts relating to cars, independence, and drinking at those ages (of course, be mindful of individual's preferences and possible restrictions; not everyone will be able to or want to partake of the new privileges). It can also be fun to celebrate less well-known perks, like turning 25 and being able to rent a car without purchasing extra insurance, or turning 35 and (in the US) being eligible to run for president. 

There are a variety of songs about age. The Silver Beetles song "When I'm 64" asks "Will you still need me, will you still feed me, when I'm 64?" My parents like the song, so I brought them dinner when they hit that age. A currently-teenaged family friend likes Taylor Swift--I'm already looking forward her twenty-second birthday so I can make her a card themed around her song "22." Adele has an album titled 21, Neil Sedaka sang "Happy Birthday Sweet 16." There are also movies related to particular ages or numbers in general that can serve as a springboard for ideas. You might have inside jokes about certain ages that could inspire ideas too.

Golden birthdays are fun to celebrate too. A golden birthday is when a person turns the same age as the date; for example, turning five on the fifth on the month. Of course, people born on the first, second, third, and probably fourth won't remember their golden birthdays, but it can still be a fun excuse for a special gift (or wait for them turn 11, 22, or 33 and call it a platinum birthday). I give my godchildren, nieces, and nephews birthstone jewelry on their golden birthdays. The earliest golden birthday so far was when a nephew turned eight; he got a tie bar with his birthstone embedded in it. A goddaughter got a birthstone necklace when she turned twelve, and a niece got birthstone earrings when she turned seventeen. One niece will have to wait until she's 29 for hers!

If you happen to share a birthday with someone you know, that can also be special. One of my daughters was born on my cousin's birthday, and she sends her "birthday twin" a card every year. I also know a few parents whose children were born on their birthdays and other people (aside from twins and other multiples) who share birthdays and enjoy celebrating with the other person.

Monday, February 1, 2021

Sewing Tutorial: Fidget Mats

I love the marble mazes I posted two months ago, but they might not be appropriate fidget toys if you need to worry about choking hazards--enough chewing can get the marbles out, and babies and some older people are going to chew. Here's an alternative sewing project for when that's a concern. It's also a great way to use up small amounts of fabric and ribbon.

No choking hazards here!

SUPPLIES

Four pieces of different textures of fabric
Six (or more) ribbons of different texture and width--none with wires
Fabric scissors
Regular scissors
Rotary cutter
Cutting mat with grid and ruler
Clean potato chip bag

Regular scissors lest your sewing ancestors haunt you
when it comes time to cut the bag.
DIRECTIONS

Cut the ribbon into four-inch (10 cm) long pieces. If you only have a small amount of ribbon, three inches  (7.5 cm)will suffice, but four is easier to work with.
If possible, have each ribbon a different texture than the other.
Using your regular scissors, cut the potato chip into a ten inch by ten inch (25 cm) square. The bag should already have been wiped clean and run through the dishwasher or washing machine. You can also use any sort of bag with the same feel as a potato chip or buy crinkle paper outright.
USE REGULAR SCISSORS, NOT FABRIC SCISSORS
Next, cut three of your fabrics into three-inch (7.5cm) wide by nine-inch (23 cm) wide strips, and the fourth into a nine-inch by nine-inch (23 cm) square. 
I used fleece, a silky piece, and minke for the strips,
and flannel for the square.

Now you should have six lengths of ribbon, one chip bag square, three strips of fabric, and one square of fabric. Time to start assembling the fidget mat.
Ready to go
Sew the strips along the long edges with the right sides facing, to make them into a square.
I chose to order them fleece, silky, minke
Square up the edges.
See-through rulers with grids are the best.
Fold the ribbons in half and pin then around the perimeter, leaving a little bit of each raw each hanging over the side, to ensure they get caught when you sew them in place.
You can sew them in right now and remove the pins,
or after the next step and just take extra care to watch for pins when turning.
Layer your pieces with the chip bag on the bottom, fabric square right side up, strips with ribbons right side down. 
The bag might try to curl, which is why having it bigger than
the fabric pieces is nice.
Pin or clip the pieces together and sew around the perimeter, leaving a space open for turning.
If you haven't already sewn in the ribbons, watch for those pins.
Trim the extra edges of the chip bag.
USE REGULAR SCISSORS. DO NOT USE FABRIC SCISSORS.
Trim any bulky pieces of ribbon and fabric as needed.
Back to fabric scissors.
Use a zig zag to top stitch the perimeter...
The ribbons are very secure now!
...and the seams between the strips, and you're done!
This also helps the chip bag piece stay in place.
Now the fidget mat is ready to be played with. The bag inside the fabric makes a fun crinkly noise when bent or squeezed, and the ribbons and fabric provide a variety of textures to rub.

Tuesday, December 1, 2020

Making Gifts with Kids

Most hand-made gifts that an adult might make can also be made by a child, given enough patience on the part both the child and the adult helping. Here are some ideas for gifts more with children in mind.

Check the library or a book store for ideas too; 
there are tons of craft books for kids.


CRAFT KITS

You can find craft kits just about anywhere, from dollar stores to craft stores to impulse buy sections of grocery stores. Suncatchers; modeling kits for soaps, candles, ornaments, candies; stepping stones; beading and jewelry; yarn, sewing, and other needlecraft; even baking kits--baked goods are an excellent gift for kids to help make, because even a very young child can help put sprinkles on cookies or stir a batter. Craft kits come with everything you need already in them, making them a convenient way to get all your supplies. Well, everything except patience and cleaning supplies...

You can also get ideas from the kits--maybe you have the supplies on hand already! 

TOOTHPICKS, POPSICLE STICKS, CLOTHESPINS, AND OTHER WOOD IDEAS

Little pieces of wood are great for crafts. Provided they're smooth (i.e.; no splinters), your child can use them to make flowers, butterflies (with dyed coffee filters), model planes, bookmarks, frames, and even 3D shapes like bird feeders or pencil holders. You'll also need things like paint, glue, and twine for lots of projects. Let your child's creativity lead the way!

SALT DOUGH, CLAY, PLASTER, AND OTHER SCULPTING MATERIALS

Most kids love molding and sculping shapes. While it can get messy (have them work outside, in a garage, or over spread out newspaper or junk mail ads), it's a fun way to help kids create a gift. Materials that will harden and be water-proof are good for coasters, stepping stones, and even cups, plates, and bowls so long as there are no toxic materials that can leach into food. Be sure to give these sorts of creations with instructions to hand-wash!

You can buy ready-made clay or make your own. Salt dough is popular and easy: 1 part salt, 4 parts flour, 1.5 parts water; bake the creations for two to three hours at 250F; let cool; paint. A tip: kneading salt dough is an excellent way to find paper cuts you didn't know you had. Wear gloves if you have any scratches!

Good for handprints, paw prints, any shape you have a 
cookie cutter for, and 3D objects.
There are also pottery studios that can fire higher-quality clay in a kiln, and place to paint sculptures and other pottery. At both types, you'll need to be able to get back to the studio in a week or two to pick up your finished pieces.

FILLING CLEAR VESSELS

I've most commonly seen this idea used for Christmas ornaments, but you can also make suncatchers and curios. All you need is a clear glass or plastic item and something pretty to put inside. They can be filled with ribbon, fabric, crinkle paper, silk flowers, Easter grass, colored sand, or glitter. You can drip some acrylic paint in the bottom and tip them upside-down over a paper cup until dry, letting the paint swirl around the inside. You can also paint the outside or help kids make designs with their fingerprints.

There are more shapes available that spheres,
and other sorts of containers like fancy jars.
You can also fill a jar or other container with dry ingredients for cookies or other recipes. This past Christmas, one of my kid's friends gave us plastic Christmas ornaments filled with hot chocolate powder, crushed candy canes, mini chocolate chips, and marshmallows: fancy hot chocolate!

JEWLERY AND SIMILAR DECORATIONS

Beads made from various materials, ribbon, charms, embroidery floss, jewelry wire, fishing line, maybe some chain links or earring hooks and needle-nosed pliers: have some on hand, and your child can make something as simple as a necklace with a single charm on it, or weave an elaborate friendship bracelet, or make a hair bow, craft a keychain, or even create a windchime. Be aware of choking hazards and keep an eye on things to avoid spills, and see what creations your child comes up with!

KEEP IT SIMPLE

Maybe you want something easy, something that can be done in few minutes and that your young child can handle without making a mess or getting frustrated. There's nothing wrong with a simple wildflower bouquet or a card with a picture your child drew. A painting on a piece of cardstock, felt, or thin foam makes a nice bookmark or frame for a picture! If you're already making cookies, let your child add some food coloring to part of the dough, cut some shapes, or add sprinkles or frosting. 

If your child wants to make a present for someone, gauge your child's patience, attention span, and motor skills and help guide toward a suitable craft. It might get messy, but your child will have fun and enjoy making something special to give to someone special.

Sunday, November 1, 2020

Sewing Tutorial: Sleeping Mask

 My daughter had a great idea: sleeping masks as party favors for a sleepover. They're not hard to make either! You can even embroider a fun design on the fabric prior to cutting and sewing.

Try to guess her favorite animal.

SUPPLIES

Elastic (I used 1/2' wide knit)
Less than a fat quarter's worth of flannel
Tracing paper or similar

Washed, ironed, and all the boring prep, of course.

DIRECTIONS

Take a couple measurements of the person you're making the sleeping mask for: temple-to-temple around the front of the face, and temple-to-temple around the back of the head. For my late-elementary aged child who wears a size 12, those measurements were 9 inches (23 cm) and 15 inches (38 cm).

Next, cut a template for the mask, making it a touch longer than your first measurement.

You could just do a rectangle, but a little shaping is nicer.

Fold it in half and check for symmetry, trimming if needed.

Trace the mask template on your flannel (if you want an embroidery design, do that prior to cutting) and cut out two per mask. Also cut a piece of elastic the length of your second measurement.

If you have embroidered something, be sure to center it.
I found that a 10x10 inch (25x25cm) square was 
a great size for hooping for embroidery,
and yielded fabric for one mask.
Now, layer the two pieces of flannel and the elastic. The flannel will be right sides together with the elastic in the middle. Be careful to place the elastic so that it will be evenly attached on both sides AND so that you won't sew over more than just the two spots where it will be attached (at either temple). Pin or clip the layers in place.
The elastic just barely extends past the edges of the flannels.
Now, sew around the perimeter, leaving a little space for turning.
Be sure you catch all layers, especially where the elastic is.
Turn right side out, iron, and top stitch around the entire perimeter.
I made this seam narrower than the previous one.
Another quick press with the iron and some thread trimming, and you're done!
Good night!

Tuesday, September 1, 2020

Sewing Tutorial: Toy Hammock

This is a very simple pattern designed to keep toys in check. My children like to have a few special toys in their beds, and I did too when I was their ages. With just a yard of fabric and some elastic, you can help the toys not take over the bed.

My kids keep pajamas in theirs as well.


SUPPLIES

1 yard cotton fabric
2.5 yards elastic (1 inch wide, non-roll)

Conveniently, the stores near me sell elastic in 2.5 yard packages.


INSTRUCTIONS

Hem around all four sides.

Hooray for irons and being able to crease the fabric before sewing it!

Next, you'll be sewing a tube on the cut edges (i.e., the non-selvage edges). Fold the hemmed cut edges down three inches or so, and sew along the hem. There will be one tube on each end, and the yard of fabric will have shrunk by about seven inches between the hems and the tubes.

It's not critical to get the width exact, so long as there's plenty of room for the elastic.


One tube on either cut end.
Fold the fabric in half lengthwise, right sides together. Line up the two tubes and sew the narrow edges together.

Like this. Sew on the short parts, from the folded edge to the tubes.


Don't sew over the tube; you'll need it open for the elastic.

Run the elastic through the tube.
Hooray for giant darning needles!

Finally, making sure the elastic isn't twisted, overlap the ends at least an inch and sew it together. Hide the seam inside one of the tubes, and you're done!

You could also use thread that matches your elastic, but I'd still work this inside the tube.

Ready to hang on a bed.
Depending on how heavy what it's holding is, you might want the elastic shorter,
or need to loop it around the bedposts a few times.

Wednesday, July 1, 2020

Sewing Tutorial: Mermaid, Whale, or Shark Tail

Mermaid, whale, or shark tail blankets/sleeping bag sort of things are widely available to buy ready-made in stores, but they're also not difficult to make at home. Here are the steps I followed to sew a trio of customized mermaid tails.


It's hard to find "panda unicorns in space" mermaid tails in stores.
SUPPLIES

Fleece fabric 
Cotton quilting fabric
Waistband elastic

The amounts you need will vary based on the size you're making--I used less than a yard of fleece for one child who wears a size 3 or 4T, and closer to one and a half yards for the two who wear sizes 8 and 10/12; less than a quarter yard of cotton for each, and one two-yard package of waistband elastic between the three. I've tried making tails with different elastics and with separate fabric for the fin parts, but I find this way works best.
MEASUREMENTS


You'll need to take six measurements:

1: total height
2: armpit to toes
3: around torso with arms at sides
4: around ankles with feet should-width apart
5: over the shoulder (for straps)
6: across chest (armpit to armpit)
These are the measurements for my child who wears a size 8
Next, you need to adjust some of the measurements a bit for the pattern. This is for seam allowance, and to be sure the tail isn't too tight. The tail is made in two halves, so you also need to divide the third and fourth measurements in half, as I did in the picture above.
1: subtract 4-5 inches (10- 13 cm)
2: no adjustment
3: add 2 inches (5 cm); divide by two
4: add 2-3 inches (5-8 cm); divide by two
5: add 1 inch (2.5 cm)
6: no adjustment

CUTTING THE MATERIAL

You will be cutting two identical pieces of fleece, two identical strips of cotton (or one long one cut in half), and two pieces of waistband elastic.

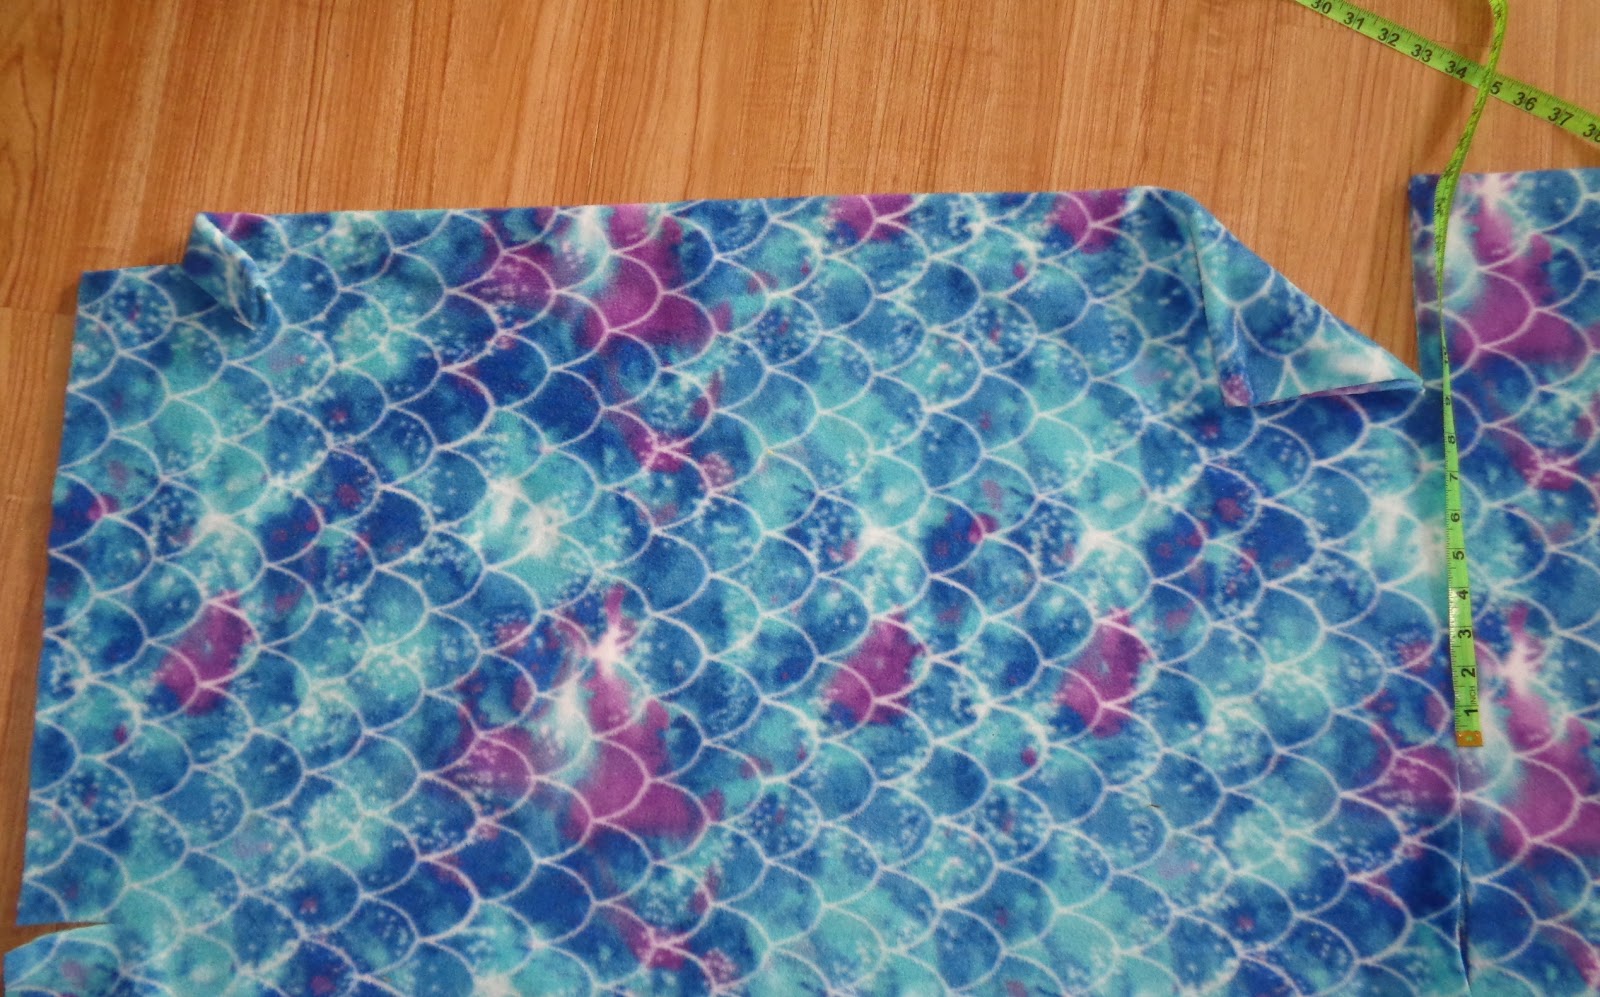
For the fleece, cut two rectangles the length of Measurement 1 by the length of Measurement 3.


In this example, 45 inches long and 18 inches wide.
Mark the center of the the short ends of the rectangle. From there, mark the spot the length of Measurement 2 from one short edge: this second mark will be where the tail starts, and the narrowest part of the tail. Center Measurement 4 on this second mark, and cut a diagonal line to shape the tail. Do the same on the other side. 
Here, the left side is 18 inches wide, tapering down to 11.5 inches wide over 36 inches.
There is still room on the right to cut the fin shape.
With the fabric remaining past the narrowest part, cut a fin shape.
Looking more a like a tail now!
The next two pieces are much simpler. Cut two pieces of cotton quilting fabric six inches (15 cm) wide by the length of Measurement 3. Fold the strips in half (i.e.; 3 inches/7.5cm wide), wrong sides together, and iron. These will be used similar to quilt binding.
Six inches by 18 inches for this tail
Finally, cut two strips of waistband elastic for the straps, using Measurement 5. 
Time to start sewing!

CONSTRUCTION

You'll start by attaching the straps and the cotton to the top of one piece of the fleece--that is, the end opposite the tail fins. Mark the center of the top side, and pin the straps on the wrong side of the fleece, according to Measurement 6. If your waistband elastic has a right side and wrong side like mine does, be sure the wrong sides of the elastic is facing the wrong side of the fleece.
The outer edges are 8 inches apart for this size tail.
Arranged this way, the black side will show--
I ended up changing it around for the silver to show.
Next, position the cotton strips. The cut edges will match up with edges of the top of the tail and the ends of the elastic. Sew these three layers into place.
Fleece wrong side up, elastic wrong side down, cotton with raw edge where the WonderClips are
Again, I actually flipped the elastic, as shown in the picture below.
My needle is in the middle position.
Just like you would do with quilt binding, bring the cotton over to the right side of the fleece. The straps will be sticking out between the fleece and the cotton. Sew the cotton down, both at the top of the tail and at the folded edge.
You could just sew a hem along the top of the tail and attache the straps within the hem,
but I think this looks nicer, and is a sturdier.
That's one side done--now the other one. It's pretty much the same process, except you need to be mindful of the half of the tail attached to the other ends of the straps. Be careful!
Once you're sure the straps aren't twisted, sew them and the cotton on like on the first half.
You should end up with your two tail halves set up like this. If you're making a shark or other fish tail, please be aware that this will make the tail "sideways" from how the animals actually look, as their tail fins are vertical compared to their bodies while whales and dolphins have horizontal tails. This might not matter to you, but it might be important for the child you're sewing for. To correct this, you would attach both ends of the same strap to the same half of the tail. It would also make it easy to add a dorsal fin to the seam that will end up along the child's back.
In retrospect, I should have moved the needle all the way to the left when I sewed the folded edges.
Now it gets easier again: pin (or clip) the two halves right sides together, and sew around the perimeter--except for across the top, of course! You can overcast the raw edges if you want to, but with fleece it's not necessary. It comes to whether you want a bulky seam or a raw seam.
I used a narrow zig-zag, and left the edges raw.
Turn it right-side-out and cut any errant threads, and you're done!

Ready for a movie night.